AWS S3 table bucket
This guide walks you through configuring AWS S3 table buckets as an external catalog in Embucket. Currently, Embucket supports S3 table buckets as the sole external catalog. AWS S3 table buckets provide built-in table maintenance, automatic compaction, and optimization features.
What you’ll learn
Section titled “What you’ll learn”Follow this guide to:
- Create an AWS S3 table bucket using the AWS command-line tool
- Configure Embucket with an S3 table bucket as an external catalog
- Explore schemas, tables, and existing data
- Create tables and load data using familiar SQL commands
- Verify table creation and query data through AWS Console
What this guide covers
Section titled “What this guide covers”This guide covers basic setup and usage of S3 table buckets with Embucket. Advanced table maintenance features, cross-region replication, and enterprise security configurations fall outside the scope of this guide.
Prerequisites
Section titled “Prerequisites”Before you begin, verify you have:
- AWS command-line tool installed and configured with appropriate permissions
- Embucket instance running locally or in your environment
- Valid AWS credentials with S3 Tables service permissions
Understanding AWS S3 table buckets
Section titled “Understanding AWS S3 table buckets”AWS designed S3 table buckets specifically for tabular data storage. They provide:
- Automatic optimization: Built-in compaction and file organization
- Schema enforcement: Native support for table schemas and metadata
- Query performance: Optimized for analytical workloads
- AWS integration: Seamless integration with Athena, Glue, and other AWS services
Create an S3 table bucket
Section titled “Create an S3 table bucket”-
Create the table bucket
Use the AWS command-line tool to create your S3 table bucket:
Terminal window aws s3tables create-table-bucket --name my-table-bucket --region us-east-2The command returns the bucket ARN:
{"arn": "arn:aws:s3tables:us-east-2:123456789012:bucket/my-table-bucket"} -
Record the bucket information
Save the following information for the next step:
- Bucket name:
my-table-bucket - Region:
us-east-2 - ARN: The full ARN returned by the command
- Bucket name:
Configure an Embucket volume
Section titled “Configure an Embucket volume”In Embucket, volumes store data and metadata. Define configuration statically in the configuration file. Specify the configuration file location with the --metastore-config flag or the METASTORE_CONFIG environment variable.
Create a section in the config file volumes and add an entry for the S3 table bucket volume.
volumes: - ident: embucket type: s3-tables database: demo credentials: credential_type: access_key aws-access-key-id: ACCESS_KEY aws-secret-access-key: SECRET_ACCESS_KEY arn: arn:aws:s3tables:us-east-2:123456789012:bucket/my-table-bucketParameters:
ident: Volume identifiertype: Volume types3-tables. This remains the only supported type.database: Database name that maps to this volumecredentials: AWS access credentialsarn: Full S3 table bucket ARN
Explore schemas and tables
Section titled “Explore schemas and tables”Explore schemas and tables in the S3 table bucket using the Snowflake command-line tool or any Snowflake-compatible tool. Use Snowflake command-line tool guide for the information on how to connect to Embucket.
-
Connect to Embucket
Start a Snowflake command-line tool session:
Terminal window snow sql -c local -
Explore schemas and tables
Explore schemas and tables:
SHOW SCHEMAS IN demo;Output:
+----------------------------------------------------------------------------+| created_on | name | kind | database_name | schema_name ||------------+--------------------------+------+---------------+-------------|| None | public | None | demo | None || None | public_derived | None | demo | None || None | public_scratch | None | demo | None || None | public_snowplow_manifest | None | demo | None || None | tpcds_10 | None | demo | None || None | tpcds_100 | None | demo | None || None | tpch_10 | None | demo | None || None | tpch_100 | None | demo | None || None | information_schema | None | demo | None |+----------------------------------------------------------------------------+ -
Explore tables
Explore tables:
SHOW TABLES IN demo.tpch_10;Output:
+-------------------------------------------------------------+| created_on | name | kind | database_name | schema_name ||------------+----------+-------+---------------+-------------|| None | orders | TABLE | demo | tpch_10 || None | nation | TABLE | demo | tpch_10 || None | customer | TABLE | demo | tpch_10 || None | part | TABLE | demo | tpch_10 || None | lineitem | TABLE | demo | tpch_10 || None | partsupp | TABLE | demo | tpch_10 || None | region | TABLE | demo | tpch_10 || None | supplier | TABLE | demo | tpch_10 |+-------------------------------------------------------------+ -
Create a table with data
Create and populate a table in one command:
CREATE TABLE demo.public.users (id INT,name VARCHAR(100),email VARCHAR(100)) AS VALUES(1, 'John Doe', 'john.doe@example.com'),(2, 'Jane Doe', 'jane.doe@example.com');Output:
+-------+| count ||-------|| 2 |+-------+ -
Query the table
Verify you can read the data:
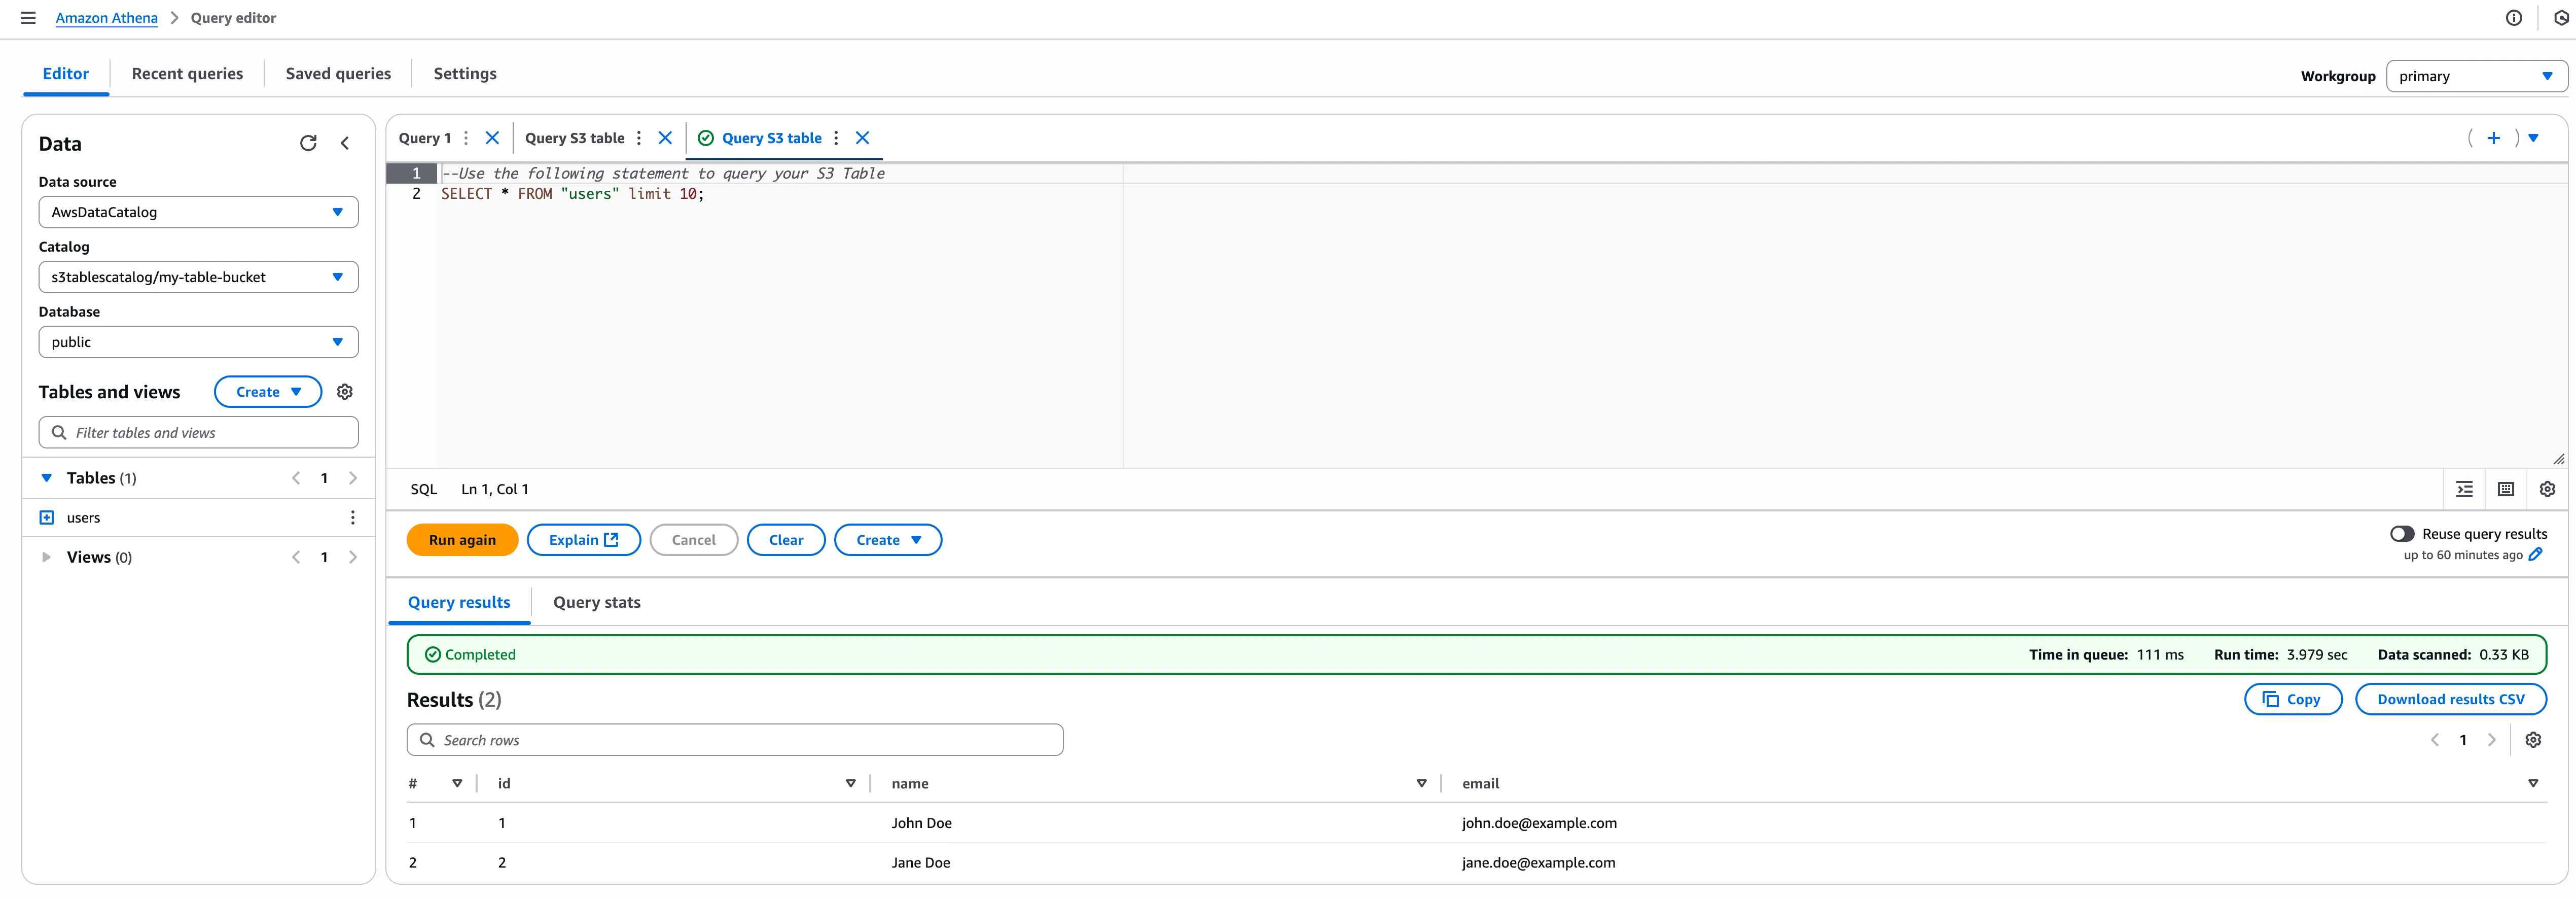
SELECT * FROM demo.public.users;Output:
+----+----------+----------------------+| id | name | email ||----|----------|----------------------|| 1 | John Doe | john.doe@example.com || 2 | Jane Doe | jane.doe@example.com |+----+----------+----------------------+
Verify in AWS console
Section titled “Verify in AWS console”Verify table creation and query your data directly through AWS services:
-
Open AWS Console
Navigate to the S3 Tables service in the AWS Console.
-
Locate your table bucket
Find the
my-table-bucketyou created earlier. -
Browse tables
Inside the table bucket, you see:
- Database:
demo - Table:
users
- Database:
-
Query with Athena
Select the
userstable and choose “Query table with Athena.” The SQL editor opens with your table ready for queries.
Next steps
Section titled “Next steps”Now that you have S3 table buckets working with Embucket, consider:
- Integration: Connect BI tools and data pipelines to your Embucket instance